Sunday, December 15, 2013

Braised Venison and Mushrooms

Braised Venison and Mushrooms


This is my blue cast iron dutch oven.  I love this pot!  It cooks great AND almost everything that has come out of it has been awesome!  My friend has dubbed it "the magical blue pot" :)


Well, here in Texas the hunting season is going on hot and heavy.  Deer meat is stacking up in the freezer and it's time to be creative.  My husband has luckily gotten some pretty large white tailed deer for us so there is no shortage at my house.  All that being said, I had a really nice back strap I had defrosted and wanted to try something different.  We enjoyed it.  Hope you and your family will enjoy it too!


This was really big. I wound up only using half of it!!


Beginning of the cubing process.


This is the size of the chunks I used (about 3/4" to 1")


Browning the meat in olive oil. Don't crowd your pot!!


After removing the meat, add in onions to saute.  Don't worry about chopping them, just slice.  They will fall apart since they cook for a long time.  Leaving them in slices will give you some pieces in the end.


Browned meat that will be added back in with the liquid, onions, and garlic.


Beef base and hot water mixed together.


Red wine.  Nuff said!


And the cooking begins...


Add mushrooms the last 30 minutes of cooking.  


Totally done...YUMMY!


Supper is served


Braised Venison and Mushrooms

1 1/2 pounds back strap (approximately) cut into 3/4" to 1" cubes
1 onion, sliced thickly
3 cloves minced garlic
2 tablespoons olive oil
2 1/2 tablespoons beef base mixed with 2 cups hot water
1 cup red wine (I used Merlot because that's what I had on hand, I would recommend something dry)
8 oz fresh mushrooms, thickly sliced
1 teaspoon crushed basil
salt
pepper
1/4 cup corn starch
3/4 cup water

Cube the back strap.  Salt and pepper both sides of the meat.  Heat large dutch oven over medium low heat on the stove top.  Add olive oil to the pot and about 1/2 the meat.  Brown on all sides.  Remove the meat to a plate and brown the remaining meat.  Remove the rest of the meat to the plate.  Place the onions in the pot and saute reducing the heat to low.  When the onions are pretty limp, add in the garlic and cook about 30 more seconds.  Add the meat and any juices back to the pot.  Pour the beef base mixed with water and the wine over the meat and onions.  Add the basil and additional salt and pepper.  Don't put too much salt at this point.  As it cooks, the flavors will concentrate.  Best to salt at the end.  Let cook covered on low for approximately 1 hour.  You may have to add additional liquid (water, wine, more beef base - your choice) while cooking so check on it about every 15 minutes.  Add in the mushrooms and cook an additional 30 minutes.  Mix the corn starch and water together.  Slowly add to the liquid in order to thicken it up.  Now you're ready to serve.  I serve this over noodles, rice, or mashed potatoes.  


Saturday, September 28, 2013

Venison Chili

I am finally a published person!  I entered a recipe contest in a power co-op magazine (I told you I lived in the country, right?) and my chili recipe was published.  Along with that I actually won first prize!  Can't believe how excited I am.  It's the little things that make me happy :)  Try it out!  If you don't have venison, it's really great with ground turkey or beef.  Heck, I've even made it with 1 pound of beef and 1 pound of breakfast sausage...that takes it to a whole different level.  Enjoy!

http://www.texascooppower.com/food/recipes/venison-chili

Batch of chili using ground venison and ground turkey.  Used my last package of venison on this :(  Thank goodness hunting season starts soon!

Monday, July 22, 2013

Tomato Basil Soup

Tomato Basil Soup

So I think I've finally made all the hot sauce (salsa if you're not in Texas) that I'm going to make for the summer.  I've put up a lot of jars!  There's still tomatoes coming in and I needed to figure out what to do with them.  I looked for a good recipe for Tomato Basil soup but just didn't see anything that stood out to me.  Figured I'd try to take a little from this recipe, a little from that one, etc. and by the end I had something that I liked a lot.  You still have to skin your tomatoes but it's not too bad unless you're dealing with a LOT of them (like at one point I had both my sinks full of tomatoes).

Tomato Basil Soup


8 cups peeled and cut up tomatoes (doesn't have to be perfect)
1 medium to large onion, diced
3 cloves minced garlic
3 1/2 cups chicken broth or stock (I prefer stock due to it's heartier flavor)
1 pint half and half
2 tablespoons dried basil
5 tablespoons butter (use the real stuff)
4 tablespoons flour
1 tablespoon balsamic vinegar
salt and pepper to taste

In large dutch oven, saute the onion in  1 tablespoon of the butter until soft.  Add the garlic and continue cooking for about 20 seconds.  Next add in the tomatoes, basil, and chicken stock.  Cook until it boils then continue to slowly boil for about 20 to 30 minutes.  Remove from the stove and using a blender or an immersion blender, make the tomato mixture smooth.  In another large pot, melt the remaining 4 tablespoons of butter and slowly add the flour to make a roux.  When the roux is a golden brown color, add ladle fulls of the tomato soup and whisk it in until it is smooth.  (This will take a little time, be patient so it won't be lumpy.)  Stir in the balsamic vinegar and salt and pepper.  Let this blend for a little while.  Turn off the stove and slowly add in the half and half.

Monday, July 1, 2013

Poblano Shrimp Appetizer

Now that summer is in full swing, our squash has finally died down to a dull roar...THANK GOODNESS!  The fun really starts for me with canning because tomatoes, peppers, etc. are all coming in and needing something done with them.  I absolutely love fresh tomatoes and basically only eat them during the summer when they have a lot of flavor.  The supermarket tomatoes pale in comparison to what can be grown in a garden at home or purchased at a local farmer's market.

On top of that, for the first time we're growing poblano peppers.  They aren't as big as what I buy at the store, but they have a great flavor.  I had only 4 small ones and didn't want them to go bad so I played around in the kitchen a little and came up with this treat.  My husband and I decided not only was it good served with a crusty bread (I used a baguette) as an appetizer, it would be a great taco filling as well.  Hope you enjoy!

Poblano Shrimp Appetizer

Cooked Shrimp (I used about 1/2 pound large shrimp and cut into thirds)
3 Tomatoes, peeled and chopped
3/4 cup diced Onion
4 small Poblano Peppers, diced (about 3/4 cup)
1 tablespoon Olive Oil
1 tablespoon Ancho Chili Powder (regular chili powder would work as well)
Salt and Pepper (to taste)
Thinly sliced Provolone Cheese

Heat a saute pan to medium heat and add the olive oil.   To the heated oil, add the onion and pepper sauteing until softened.  Add the tomatoes, chili powder, salt, and pepper and cook until most of the liquid is absorbed, tomatoes are soft, and flavors are blended (about 6 or so minutes).  

Meanwhile, heat the oven to 375.  In a baking dish place the cut shrimp in the bottom in a single layer.  Lay thinly sliced Provolone cheese over the top of the shrimp.  Pour the tomato mixture on top of the shrimp and cheese (this will be thick so you'll have to spread it).  Put in the heated oven for about 10 minutes.  Serve warm with a firm bread as an appetizer or use as a filling for tortillas.  


Sunday, June 23, 2013

Hot Sauce

So, our tomatoes are FINALLY coming in and I couldn't be more excited!!  We take our hot sauce (salsa to most people that don't live in Texas) very seriously.  My family and I really don't like store bought sauce but do use it when that's all that's available.  For the most part, at least 3/4 of our tomatoes that are grown are grown specifically for canning hot sauce.  I used to give it away when friends and family would come over. I don't do that anymore.  I figured out that the amount of time it takes to prepare it and can it, they can do it themselves.  It's really not that I'm being mean but it is a LOT of work!  All that being said, it is so worth the work!

Here is the recipe that I've used to can hot sauce for at least 15 years.  I had an older neighbor (she could be my grandmother) show me how to can.  One of the best skills I've ever learned!

Hot Sauce

16 cups fresh cored, peeled, and chopped tomatoes
3 cups chopped onion
1 cup chopped jalapeno peppers (more or less depending on the heat of the pepper and your tolerance for heat)
1/4 cup salt
1/3 cup sugar
2 cups vinegar

 Cook down until you get the consistency you like.  This can take about  1 1/2 hours to 2 hours.  Seal in prepared jars.  Makes about 8 pints.

This is before the cooking begins.


While cooking.

All sealed and ready to store.  I only had a partial amount of tomatoes ready so it made a smaller batch.  That's okay though, no tomato is ever wasted around here!

Tuesday, June 18, 2013

Sauteed Zucchini and Tomatoes

Sauteed Zucchini and Tomatoes 

I told you we had a LOT of zucchini and squash...and I really mean a LOT!  Some will get a way from you and grow into Hulk size in a day....


(See I told you! I chopped one of the large ones and it filled up a gallon bag!  Crazy!!)

So, the town I live in has a Farmer's Market.  This has been great for getting rid of some of it because I've frozen all I'm going to (have to keep room for other stuff coming out of the garden too)!  However, when it comes out of the garden early in the week, I have to do something with it since the market is only on Saturdays.  As you guessed it, here's another way to cook zucchini (or you can use yellow squash)...

Sauteed Zucchini and Tomatoes 

Zucchini (or any similar squash), Diced
Diced Fresh Tomatoes (canned will also work but drain most of the juice off)
Sliced Mushrooms
Onion
Garlic
Basil
Oregano
Salt and Pepper
Olive Oil

To a hot skillet, add a little olive oil.  Sauteed the onion and garlic in the oil briefly, just to soften.  Add the zucchini, tomatoes, basil, oregano, salt, and pepper.  Just eyeball this part.  I don't have exact measurements since it's going to depend on how much squash you have.  When zucchini is beginning to soften (we like it still with a little bite to it) add the mushrooms and cook a few more minutes.  

This is a great side dish but if you add quite a few tomatoes, it makes an awesome pasta sauce!


Monday, June 17, 2013

Venison Spaghetti Sauce with Veggies


Venison Spaghetti Sauce with Veggies

Here's another thing to do with all the zucchini and squash we've been getting.  I make big batches of this sauce and freeze it.  It's great to come home after a busy day and just defrost the sauce, cook some noodles, make a quick veggie, and garlic toast.


                  Venison Spaghetti Sauce with Veggies


Approximately 2 pounds of tomatoes (peeled and chopped)
1 chopped onion
3 – 4 cloves minced garlic
1 pound ground venison meat (can use regular ground beef or turkey)
3 tbsp. fresh chopped oregano (or less of dried)
1 small zucchini, diced
1 small yellow squash, diced
8 oz. fresh mushrooms, sliced
3 tbsp. fresh chopped basil (or less if dried)
½ tsp. red pepper (can use flakes or powder) – optional
1 cup dry red wine (Merlot, Cabernet, etc.)
2 to 3 cups water
Salt and Pepper
Olive oil

Place a little olive oil in a large HOT pot.  Brown ground meat.  Saute the onion for a little while until soft.  Add garlic for about 30 seconds more.  Add the tomatoes and remaining ingredients.  Cook until you reach the consistency you like (for me, it's usually an hour or longer).

All the spices are approximations.  I don’t measure anything and have just played with it until I get the flavors I like.  Further, if you don't have fresh tomatoes, use a 28 oz. can crushed tomatoes and 1 can tomato sauce.

Friday, June 14, 2013

Veggie Lasagna

So, as you all know, we have had a LOT of squash and zucchini.  Well, here's another recipe that I came up with...Veggie Lasagna without any noodles!  Give it a try, even my meat eating husband liked it!  That's high praise from someone who has meat at EVERY meal!


Veggie Lasagna

2 zucchini thinly sliced length-wise
2 yellow squash thinly sliced length-wise
Approximately 2 cups mushrooms sliced thickly
2 jars Classico Sweet Basil Spaghetti Sauce
1 16 oz container Ricotta cheese
2 cups shredded Mozzarella cheese
1 egg
1/2 tablespoon dried parsley
1 box frozen spinach

Defrost spinach and drain really well.  Mix spinach, Ricotta cheese, Mozzarella cheese (reserve about ½ cup), and egg for filling.  In bottom of 9x13 pan, pour a small amount of the spaghetti sauce (about ½ to ¾ cup).  Spread out and lay the thin strips of zucchini in a single layer.  Put ½ of the filling on top of the zucchini.  Pour about ½ to ¾ jar of spaghetti sauce on top of the filling.  Layer mushrooms next covering with filling and more sauce.  Finish with a layer of yellow squash, more sauce, and the remaining ½ cup of cheese.  Bake at 350 covered for 45 minutes.  Remove the foil and bake another 15 minutes.  Let sit at least 20 to 30 minutes before serving so it will firm up.  (Note:  I did not use all the sauce but 1 jar wasn’t enough.  I used about a jar and a half.)


Before going into the oven.

Finished!


Wednesday, June 12, 2013

Oven Fried Squash Patties

Oven Fried Squash Patties


I haven't written on this blog in quite a while, the Spring Semester at school was uber busy plus all the Spring things that come with living in the country :)  One of those is gardening.  We love fresh veggies and usually have a lot to cook, can, freeze, etc.  This year our squash has gone nuts!  My family loves squash and zucchini grilled, roasted in the oven, sauteed on the stove, stir-fried, and put into spaghetti sauce.  I was running out of ideas.  My husband grew up with fried squash (I did not, my mom always boiled it on the stove).  I was trying to think up a way to make it "fried" without frying it.  This is what I came up with and I was very happy with the results (although next time I'll add one minced jalapeno just because I think it will taste great!).  The down-side, turning on the oven in the heat of the summer, the up-side is there is no frying and minimal oil involved.


3 large yellow squash, shredded and drained between paper towels
1 small onion, minced
1 1/3 cup Italian seasoned bread crumbs
1 cup Parmesan cheese
1 tsp garlic powder
1 tsp dried basil
2 beaten eggs
Non-stick Spray

Preheat oven to 450 degrees.  Mix all ingredients together in a large bowl.  I had to use my hands to mix this, a spoon just didn't cut it!  Form into patties and place on either a well sprayed cookie sheet, one lined with parchment paper, or use a baking stone (I use stones so I don't have to add any additional fat).  Spray the tops of the patties lightly with non-stick spray.  Place in the oven for approximately 20 minutes.  Turn the patties over and cook another 15 to 20 minutes.  I'm sure you could cook these with less time but I wanted mine crispy!  Take out of oven and let sit for a little while before you eat them...they are hot!!  Enjoy!

Before going in the oven.

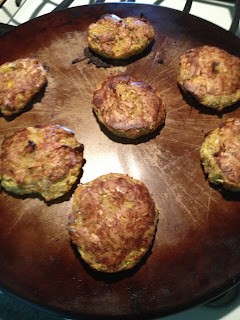
After coming out of the oven.  As you can tell, I use my stones for EVERYTHING!!  I have one that's almost black and nothing sticks to them! 

Saturday, March 23, 2013

Venison Meatloaf

Venison Meatloaf

We all love meatloaf, especially with venison, but sometimes I just don't have the time to make it during the week.  This Saturday I took my regular meatloaf recipe and jumped on the muffin tin bandwagon.  Let me tell you, this is the way to go when cooking meatloaf!  They are the perfect size and they're easily put away to reheat (fridge or freezer).  Give it a whirl, you won't be sorry!

2 cans tomato sauce
3 tablespoons sugar
3 tablespoons barbeque sauce
1 pound ground venison (I have also used turkey and beef)
1/2 tsp garlic powder
3/4 tsp onion powder
salt 
pepper
6 tablespoons flour

Preheat oven to 375.

In a small sauce pan, heat 1 1/2 tablespoons sugar, 1 1/2 tablespoons barbeque sauce, and 1 can tomato sauce until the sugar is melted.  Let cool slightly.

In a large bowl mix meat, garlic powder, onion powder, flour, salt, pepper, and the tomato sauce mixture.  I find it best just to use my hands to mix it up.  Lightly spray a muffin tin with cooking spray.  Divide the meat between the wells.  

Cook for approximately 30 minutes.  Toward the end, mix the rest of the sugar, barbeque sauce, and tomato sauce again on the stove.  Remove the muffin tin from the oven and put a spoon of the sauce on top. (If you have any noticeable fat, dab off with a paper towel.  I don't seem to have this problem with venison but some ground meat may.)   Put back in the oven for about 5 to 10 minutes. You will have leftover sauce.  We like ours this way.  If you don't, feel free to cut the sauce ingredients in half.


Tuesday, March 12, 2013

Brown Mustard Coated Venison Tenderloin

Brown Mustard Coated Venison Tenderloin

So this is my spring break from school and I've had a little more time to think up different ways to cook some of that venison we have in the freezer.  Last night I came up with this idea for a brown mustard coating (my family loves all things mustard, especially my husband) and it turned out delicious!  I will be making this again for sure!

1 Venison Tenderloin (mine was about 2 pounds)
3 tablespoons brown mustard 
1 1/2 tablespoons paprika
3 tablespoons barbeque sauce (I used hickory smoke flavored)
1 teaspoon salt
1/2 teaspoon ground black pepper
2 teaspoons soy sauce
2 cloves minced garlic

The tenderloin I took out was a bit too big so I cut it in half first.

Main part of the coating.

Ready to go in the oven.

All done and ready to eat :))

Preheat the oven to 325.  Mix all the ingredients together except the tenderloin.  Dry the tenderloin well with a paper towel and put it in a baking dish (I used a 9x13 pan).  The mixture is a little thick so use a spoon and put 1/2 of it on top of the tenderloin.  Cover with foil and bake for approximately 40 minutes.  Remove from the oven, uncover, turn the meat over, and put the rest of the mixture on top of the meat.  Cover again with the foil and return it to the oven for about 30 minutes.  Remove the foil and let cook for approximately 15 minutes.  Take the pan out of the oven, place the meat on a plate or cutting board and cover with foil.  Let it rest for about 10 minutes before slicing.  (Note:  I took the remaining drippings and put them in a sauce pan.  I then added a little corn starch and water to thicken it to make a gravy.  That cinched the deal for my husband and youngest daughter - they loved the sauce!)

** Please note the times are really approximate.  It's going to depend on how much the tenderloin you're cooking weights.  Just keep an eye on it.  Also, I am betting this would be awesome grilled.  I'll be trying that next! **


Saturday, March 9, 2013

Egg Brunch Pie

Egg Brunch Pie

Not only does my husband hunt, he also has chickens that we use just for eggs.  Well, right now we are in an avalanche of eggs...I mean there's a LOT!!  So, since I don't have much room left for another carton in my refrigerator, I had to do something.  Living in the country, you don't just run to the store when you're out of something and with the price of gas, we definitely consolidate our trips.  Knowing that, I scoured the pantry and the fridge for anything useful to put into an egg dish trying to use some of these eggs up.  This is what I came up with.  I'm betting you can do the same with whatever you have too!


2 potatoes, sliced thin (I used a mandolin)
1/2 cup chopped onions
7 eggs
1/4 cup milk
sliced mushrooms
fresh spinach
chopped sun dried tomatoes in olive oil
5 or 6 slices of lunch meat ham (chopped)
shredded or chopped Swiss cheese
1/4 cup fresh grated Parmesan cheese
salt and pepper 

**Note:  You may want to spray some non-stick cooking spray or use parchment paper.  I use stone bake-ware from Pampered Chef so I don't think about that too much.**

Heat oven to 350.  Put sliced potatoes in the bottom and on the sides of a deep-dish pie plate and cover with the onions.  Place in the oven for about 12 minutes to soften the potatoes a little (this is going to act as your "crust").  In a bowl, whisk together the eggs, milk, salt, pepper, flour, and Parmesan cheese.  After you remove the crust from the oven, layer the spinach, mushrooms, meat, Swiss cheese, and sun dried tomatoes.  Pour the egg mixture on top and bake until set.  Depending on the thickness of your potatoes in the "crust", you may have to cook it a little longer to get the right texture.  Mine took about 30 minutes to cook, just keep an eye on it.  It's done when you insert a knife in the middle and it comes out clean.

Wednesday, February 20, 2013

Bacon Wrapped Venison Tenderloin (Backstrap)

 I love my life but some days I just need a vacation from it - I'm sure we ALL feel that way at one time or another.  The weekends are my little vacation times, usually, but it really didn't happen that way this past weekend.  We were way too busy to rest up.  All that being said, I had to make this past Sunday into a little bit of a paradise for my family and me or someone wouldn't have made it to Monday alive (mainly me!).  So between running my daughter to a practice she had and then taking her shopping for her birthday, I didn't have too much time to relax.  We finally were home to stay around 4:00 that afternoon.  I had prepped the backstrap between the two events (I was able to run home for a bit) and then the grilling began.  I must say, this is probably my husband's favorite way that I cook backstrap.  He didn't mind the wait at all!

Bacon Wrapped Venison Tenderloin (Backstrap)

Venison Tenderloin (backstrap) about 2 pounds
1/2 onion, sliced
2 jalapenos, sliced
4 to 6 slices thick bacon
2 tbsp brown sugar
1 tsp mustard powder
1 1/2 tsp chili powder
1 tsp kosher salt
toothpicks or kitchen string

With a really sharp knife, split the meat about half-way down through the length of the tenderloin.


Place the jalapeno and onion slices in the slit.


Using either toothpicks or kitchen string, seal up the meat around the slices so they won't fall out.


Wrap the bacon around the outside of the meat, securing with toothpicks or kitchen string.


Gather your spices together and mix them well.


Rub the spices on the outside of the bacon.


At this point, if you can't cook it right then, wrap the tenderloin in plastic wrap and put it in the refrigerator.  (I did this for about 3 hours.)

You can determine how you are going to cook this, oven or grill.  We prefer the grill.  I place the meat on a very hot grill so it will sear the bacon.  Watch this step closely because you don't want it to burn.  After the bacon has gotten a little color on it, I move the meat over to the cooler side of the grill and continue cooking.  Depending on the thickness of the meat, it can take about an hour.  


After removing the meat from the grill, tent it with some foil for about 15 minutes before slicing.  This will help keep the juices in the meat.  Enjoy!